Introduction
There are several blogs on this topic, but what I discovered was the difficulty level. The blogs’ technical language was difficult, and we were seeking a simple lesson. That’s when we decided to write my blog in a straightforward manner.
In this blog, we’ll learn about Socket.IO and create a demo chat application using ReactJS and NodeJS.
What is Socket.IO?
It’s not possible for us to talk about socket.IO when we are discussing transferring real-time data and chat applications!
To keep it short, Socket.IO is a Javascript library that is built for real-time data transfer.
Things to keep in mind regarding Socket.IO:
- Javascript library used for real-time apps
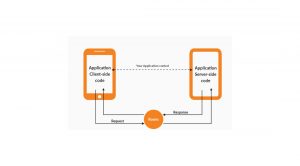
- Enables bidirectional real-time communication between servers & clients
- With polling as a fallback, it uses WebSocket protocol.
- It provides various features as broadcasting, async I/O, and storing data of the respective client as it’s not just a wrapper for WebSocket
- Socket.IO needed socket.io libraries both on the client and server sides.
The Flow of Building Chat App
Let’s look at the technical concept and flow behind the room before moving on to the high-level development flow.

Follow the steps to Build a Chat Application with ReactJS, NodeJS, and Socket.IO.
Server-Side
Getting Started
Make a new folder, Navigate the folder and generate a package.json
mkdir chat-app-backend
cd chat-app-backend
npm init -y
Install Dependencies
npm i express socket.io cors
Basic Server Setup
Create a file naming as app.js. Now start coding.
Now import required packages in that.
const express = require(“express”);
const path = require(“path”);
const http = require(“http”);
const app = express();
// Creating http server
const server = http.createServer(app);
const PORT = process.env.PORT || 3000;
console.log(‘Server listening to PORT: ‘, PORT);
server.listen(PORT);
Connect Socket.IO
Here you need to add socket.io to the server.
As it has already been installed in the above step.
Now, make it required in the app.js, and it is good to go for implementing socket.io.
const activeUsers = new Set();
let roomId = “”;
//Creating socket connection
A socket is an endpoint of a two-way communication linked between two programs running on the network.
// … An endpoint is a combination of an IP address and a port number.
io.on(“connection”, (socket) => {
// Joining room for conversation
socket.on(“JOIN_ROOM”, (room) => {
roomId = room;
socket.join(room);
});
// To emit an event from your client, use the “emit” function
// on the socket object
// To handle these events, use the “on” function on the
// socket object
// Create an event NEW_MESSAGE. It will be used to
// send messages from the client-side.
// Listen to NEW_MESSAGE for receiving new messages
socket.on(“NEW_MESSAGE”, (msg) => {
io.to(roomId).emit(“NEW_MESSAGE”, msg);
});
// To disconnect participant from room
// And remove specific user from object
socket.on(“disconnect”, () => {
activeUsers.delete(socket.userId);
// Triggering this event disconnects user
io.to(roomId).emit(“user disconnected”, socket.userId);
});
});
Explanation
- We want all the users to receive that message when a user sends out a message in the room.
- Import socket.io and create its object.
- The cors parameter- It is used to execute the code locally and handle cors errors.
- We will let the user join the room with its unique roomId after establishing the socket connection.
- Will use the event for sending and receiving messages through socket.io.
- NEW_MESSAGE – this event will listen to new messages in the joined room.
- For sending messages, ensure to use the same event on the client side.
- The user is disconnected from the room and removed from the object on disconnecting the socket.
API for Room ID- getRoom
Here you need to create a file named users.js. Use the below code to generate and send room ID.
const { v4: uuidv4 } = require(‘uuid’);
const getRoom = (req, res) => {
const randomGenUniqueName = uuidv4();
res.status(200).send({ roomUrl: randomGenUniqueName });
};
Now moving towards the Front-end part.
Client-Side
Using the below command, make a client folder named chat-app-frontend.
npx create-react-app chat-app-frontend
cd chat-app-frontend
Install Socket.IO for Client
npm i socket.io-client
Connection of Client-Side Socket.IO
Build helper.js and make the client socket connection in that code. Also import the function anywhere as required to send and receive messages on the client side.
Use this code to establish a connection.
Open helper.js.
import socketIOClient from “socket.io-client”;
// socketIOClient connects front-end to with socket backend URL
export const socket = socketIOClient(process.env.REACT_APP_SOCKET_URL, {
transports: [ “websocket” ],
reconnectionAttempts: 20,
reconnectionDelay: 5000
});
Front-end Components
Let’s make front-end components for our UI.
There are two scenarios on the Login page.
- Create Room: The user creates a room and shares the room id with other users to join and start the conversation.
- Join Room: Click the Join Room by filling the required text fields.
The UI for Login will look like this:

Here, create a file named Login.js. While clicking the button, use this logic.
When the user clicks Join Room, handleOnJoinRoom() will be called.
The username in the local storage will be stored by setItemInStorage().
An API will be called if the user clicks Create Room, giving you the Room Id.
It is required to store the username in the local storage again.
const handleOnJoinRoom = () => {
if (roomId.trim().length > 0) {
auth.login();
setItemInStorage(‘user’, {
name: userName,
});
history.push(`/${roomId}`);
}
};
const onLoginClick = (e) => {
e.preventDefault();
if (roomType === ROOM_TYPE.createRoom) {
setLoading(true);
toastSuccess(‘Room created!!’);
getCreateRoom()
.then((res) => {
setLoading(false);
if (res && res.roomUrl) {
auth.login();
setItemInStorage(‘user’, {
name: userName,
});
history.push(`/${res.roomUrl}`);
}
})
.catch((err) => {
setLoading(false);
toastError(err);
});
} else {
handleOnJoinRoom();
}
};
The user will be redirected to the Dashboard once they are logged in.
For Dashboard, the UI will look like this:

Create a Dashboard.js and replace it with the following given code.
import React, { useEffect, useState } from ‘react’;
import { Container } from ‘reactstrap’;
import ChatContainer from ‘../components/chat-components/ChatContainer’;
import MessageBar from ‘../components/chat-components/MessageBar’;
import Header from ‘../components/common/layout/Header’;
import { socket } from ‘../utils/helper’;
const DashBoard = (props) => {
const { params } = props.match;
const [messages, setMessages] = useState([]);
useEffect(() => {
// Trigger JOIN_ROOM with unique room ID
socket.emit(‘JOIN_ROOM’, params.roomId);
}, [params.roomId]);
useEffect(() => {
// Trigger ‘NEW_MESSAGE’ event
// Message received in the event NEW_MESSAGE
socket.on(‘NEW_MESSAGE’, (message) => {
setMessages((prevState) => […prevState, message]);
});
}, []);
return (
<>
<Header roomId={params.roomId} />
<Container fluid className=”p-0″>
<Container className=”d-flex flex-column chat-container”>
<div className=”scroll-content pl-2 pr-2″>
<ChatContainer messages={messages} />
<MessageBar />
</div>
</Container>
</Container>
</>
);
};
export default DashBoard;
Moving on two other two components:
ChatContainer.js – It is Used for displaying chat
MessageBar.js – It is a Text Field for typing a message and sending it
Open the ChatContainer.js and write this code.
It displays the message and sender’s name in the chat room.
import React, { useEffect, useRef } from ‘react’;
import PropTypes from ‘prop-types’;
import { getItemFromStorage } from ‘../../utils/helper’;
const ChatContainer = ({ messages }) => {
const { name } = getItemFromStorage(‘user’);
const messagesEnd = useRef(null);
useEffect(() => {
// used for scrolling the chat smoothly
messagesEnd.current.scrollIntoView({ behavior: ‘smooth’ });
}, [messages]);
return (
<>
{messages && messages.length
? messages.map((message, index) => (
<div
className={`msg-container msg-container-${
message.userName === name ? ‘right’ : ‘left’
}`}
key={index}
>
<div className=”msg-header”>
<span className=”msg-user-name”>
{message.userName}
</span>
</div>
<div className=”msg-content”>
<span className=”msg-text”>
{message.msg}
</span>
</div>
</div>
))
: null}
<div style={{ float: ‘left’, clear: ‘both’ }} ref={messagesEnd} />
</>
);
};
ChatContainer.propTypes = {
messages: PropTypes.array.isRequired,
};
export default ChatContainer;
Now open MessageBar.js .
Now Import socket from helper.js
import { socket } from ‘../utils/helper’;
Here, we need to write this logic for sending the message on the button click.
const [ value, setValue ] = useState(“”);
const { name } = getItemFromStorage(“user”);
// On submit
const handleSubmit = (msg) => {
setValue(“”);
// Trigger NEW_MESSAGE with object containing userName & msg
socket.emit(“NEW_MESSAGE”, { userName: name, msg });
};
Here’s the UI part for the button-
<Button
className=”ml-2″
color=”primary”
disabled={!value.trim().length}
onClick={() => handleSubmit(value)}
>
<FontAwesomeIcon icon={faPaperPlane} />
</Button>
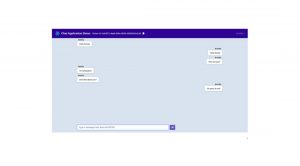
The User Interface will look like this-

To view the sending and receiving of the messages, open your Network Tab.
Here’s the screenshot:

Conclusion
We hope this guide has helped you understand the stages involved in creating a chat application. Full-stack developers are the ideal to recruit since they understand both the front-end and back-end of a system. They strive to provide optimal solutions that benefit both the client and server sides.


Add comment