
Overview of UI Components
User interface (UI) component is a discrete unit or module that we use to perform some task and to showcase certain staff in the UI. Some of the examples of UI components that we generally used in UI are button, checkbox, radio button ,and menus.
UI components are frequently pre-built or customizable, it is simpler for developers and designers to create unified and consistent user interfaces, which saves cost and development time. Moreover, UI components provide easy upkeep, updating, and consistency of design across many application or website pages.
Overview of UI Components Automation Testing
The goal of UI Component Automation Testing is to automate the many components that make up a software application’s user interface. In UI component automation testing, scripts are written to interact with the graphical user interface of the programme in the same way that a human user would. It mimics user activities such selecting options, filling out forms, pressing buttons, and confirming that the application behaves and responds as intended.
There are several solutions on the market that may be used to automate user interface elements, and Playwright is one of them that we can use to automate various UI components. Playwright is a popular automation framework for end-to-end testing of web applications. It allows developers to test UI components by simulating user interactions and validating the expected behavior of the components.
In this blog you will see how we can automate various UI components using Playwright. Before that let’s see some of the Key aspects of UI elements.
Key aspects of UI elements automation testing
UI elements automation testing involves automating the testing of various user interface elements within a software application. Here are some of the key aspects to consider when conducting UI elements automation testing:
Element Identification:
- To identify UI elements individually, use dependable locators like IDs, class names, CSS selectors, or XPath.
- Select locators that will not fluctuate so that your automation scripts remain stable.
Data Input and Validation:
- Automate data input into various UI elements to validate their ability to accept different types of data.
- Check that, upon submission, the input data is processed and presented accurately
Interactions and Actions:
- To mimic actual user behavior, automate clicks, typing, hovering, and dragging.
- Validate different user actions on UI elements, including buttons, links, input fields, dropdowns, checkboxes, and radio buttons.
Error Handling and Validation:
- Automate tests for error scenarios, such as submitting a form with invalid data.
- Check that the programme gracefully handles problems and that error messages and alerts are shown as intended.
Automate UI Components Using Playwright
Automating UI elements becomes a streamlined and efficient process with Playwright, a cutting-edge tool designed for seamless browser automation. Playwright makes it possible for developers to rapidly develop interactions with a range of UI elements, guaranteeing an ideal user experience. Playwright has an advantage over other automation tools because of its ability to navigate through intricate web architectures and interact with shadow DOM components with ease. Because of its unique capabilities, Playwright stands apart and is a very useful tool for UI testing and end-to-end automation.
In the section below you will see how we can automate different UI components / elements.
Automate Checkbox
There are different ways of checking the checkbox in Playwright. We have built-in method to test the check box
- We can use .check() method to check whether checkbox is checked
// Check the checkbox
await page.getByLabel(‘I agree to the terms and condition).check();
2.To check whether the checkbox is checked we can use .isChecked() built-In method of the playwright
// Assert the checked state
expect(await page.getByLabel(‘Subscribe to newsletter’).isChecked()).toBeTruthy();
3.To Uncheck the checkbox, we can use the .uncheck() Built-In method of Playwright.
// Check the checkbox is un-check
await page.getByRole(‘checkbox’).uncheck();
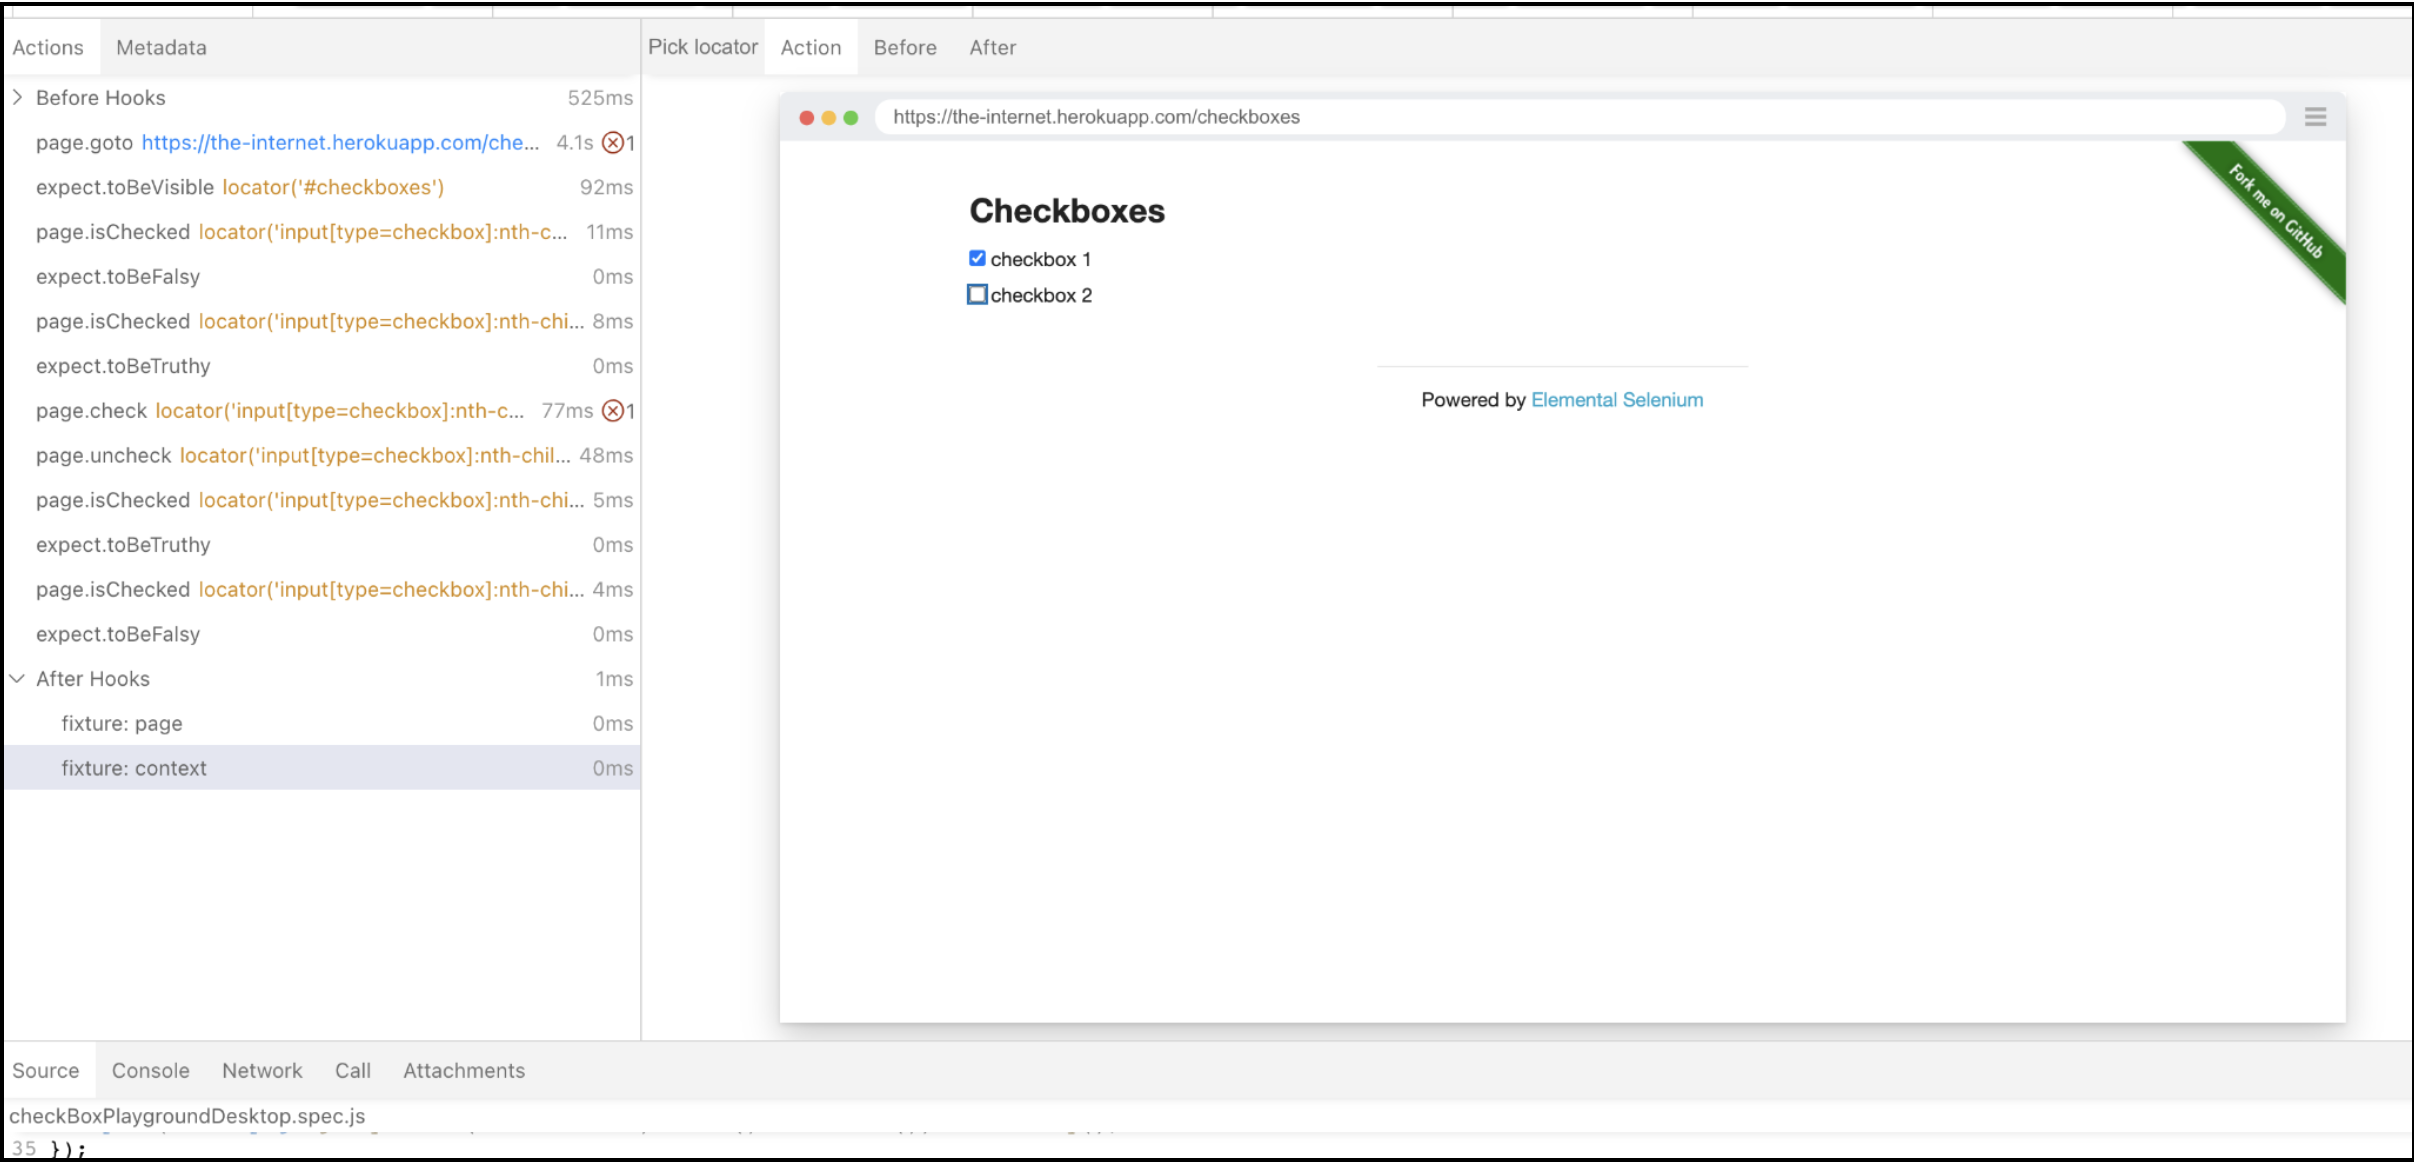
For demo purpose lets take an example of site https://the-internet.herokuapp.com/checkboxes
Scenario
|
Code of above scenario
test(“Verify Checkbox Functionality “, async ({ page }) => {
await page.goto(‘https://the-internet.herokuapp.com/checkboxes’)
//Verify checkbox1 is un-checked
expect(await page.isChecked(‘input[type=checkbox]:nth-child(1)’)).toBeFalsy()
//Verify checkbox2 is checked
expect(await page.isChecked(‘input[type=checkbox]:nth-child(3)’)).toBeTruthy()
//Select the checkbox Checkbox1
await page.check(‘input[type=checkbox]:nth-child(1)’)
//Un-check the Checkbox2
await page.uncheck(‘input[type=checkbox]:nth-child(3)’)
//Assert checkbox1 is now checked
expect(await page.isChecked(‘input[type=checkbox]:nth-child(1)’)).toBeTruthy()
//Assert checkbox2 is now un-checked
expect(await page.isChecked(‘input[type=checkbox]:nth-child(3)’)).toBeFalsy()
})
Execute the above code and we can see test case is executed successfully.
Automate Radio Button
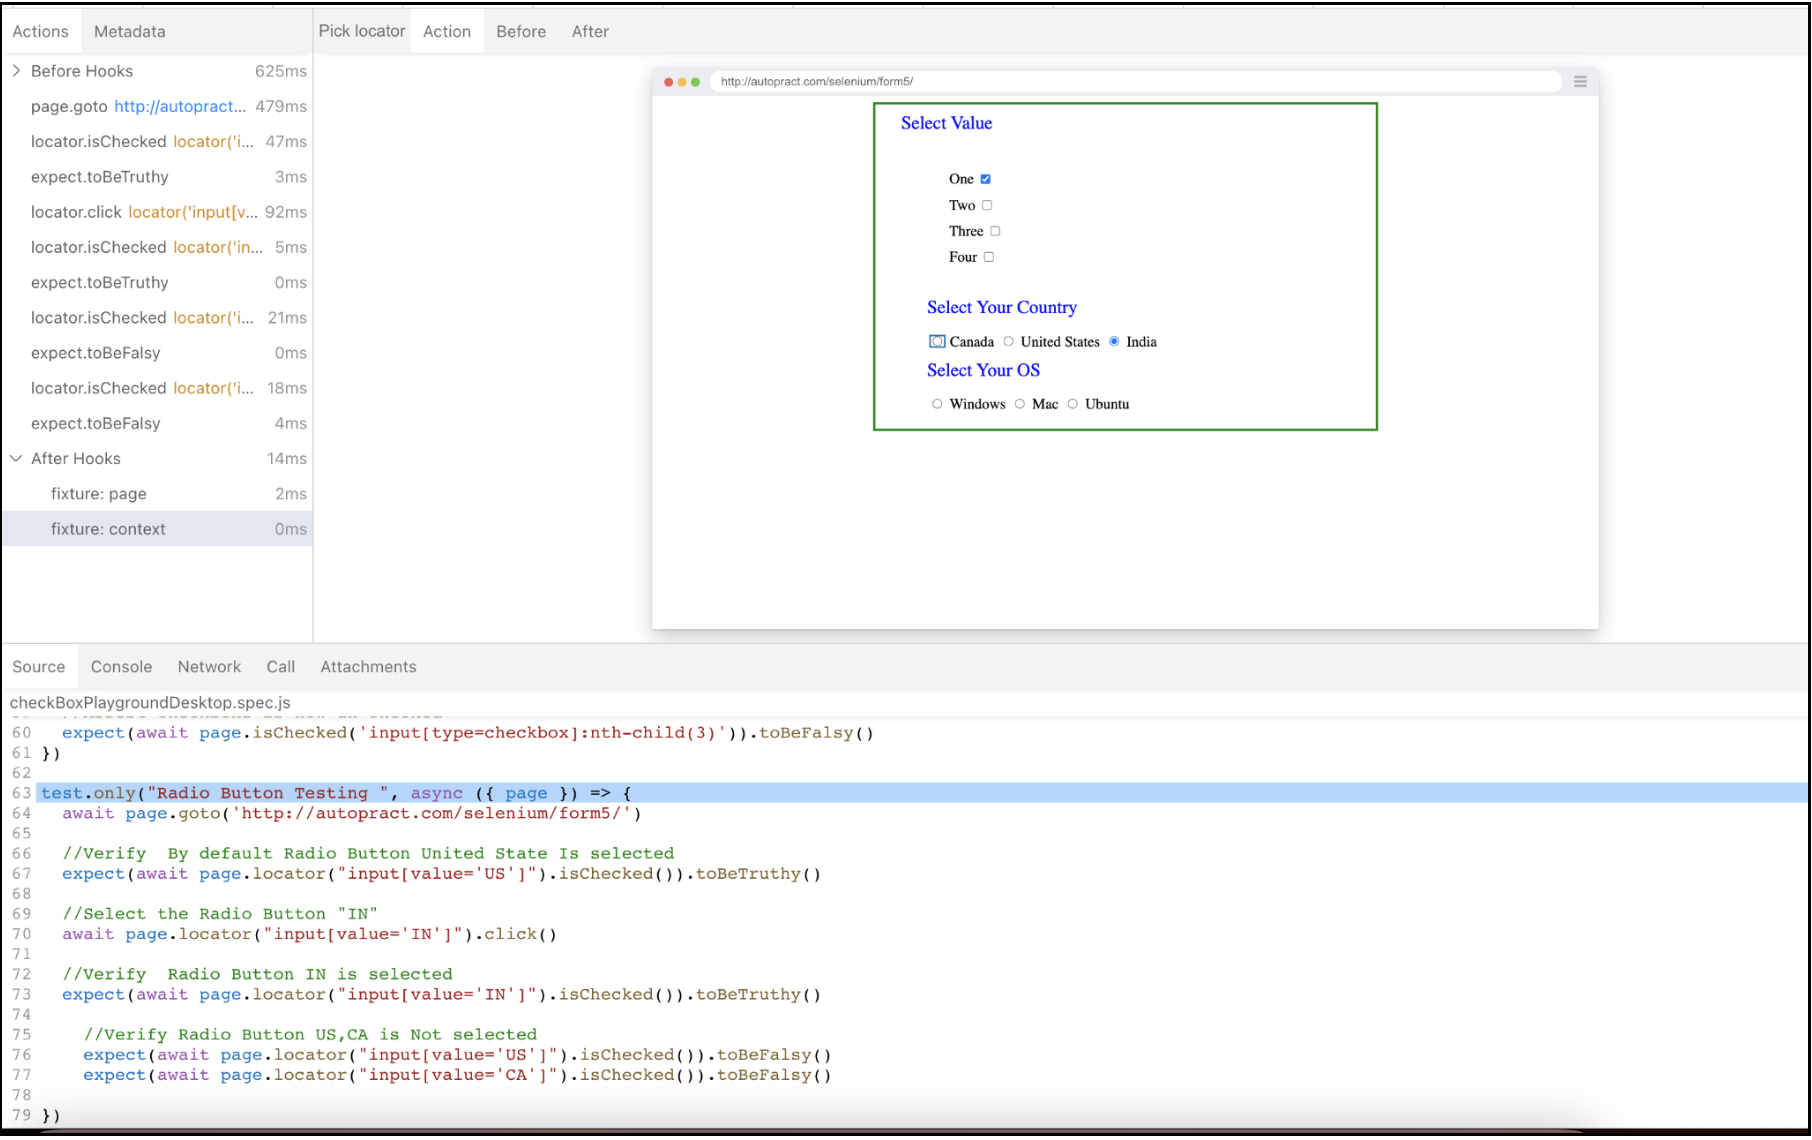
For demo purpose of Radio button lets takes the example of site http://autopract.com/selenium/form5/
Scenario
|
Code of above scenario
test(“Radio Button Testing “, async ({ page }) => {
await page.goto(‘http://autopract.com/selenium/form5/’)
//Verify By default Radio Button United State Is selected
expect(await page.locator(“input[value=’US’]”).isChecked()).toBeTruthy()
//Select the Radio Button “IN”
await page.locator(“input[value=’IN’]”).click()
//Verify Radio Button IN is selected
expect(await page.locator(“input[value=’IN’]”).isChecked()).toBeTruthy()
//Verify Radio Button US,CA is Not selected
expect(await page.locator(“input[value=’US’]”).isChecked()).toBeFalsy()
expect(await page.locator(“input[value=’CA’]”).isChecked()).toBeFalsy()
})
Execute the above code and you can see test case is executed successfully.
Automate Drop down
In Playwright we can handle drop down Using selectOption() Method with various parameter
- .selectOption() method with values.
- .selectOption() method with Label.
- .selectOption() method with Index.
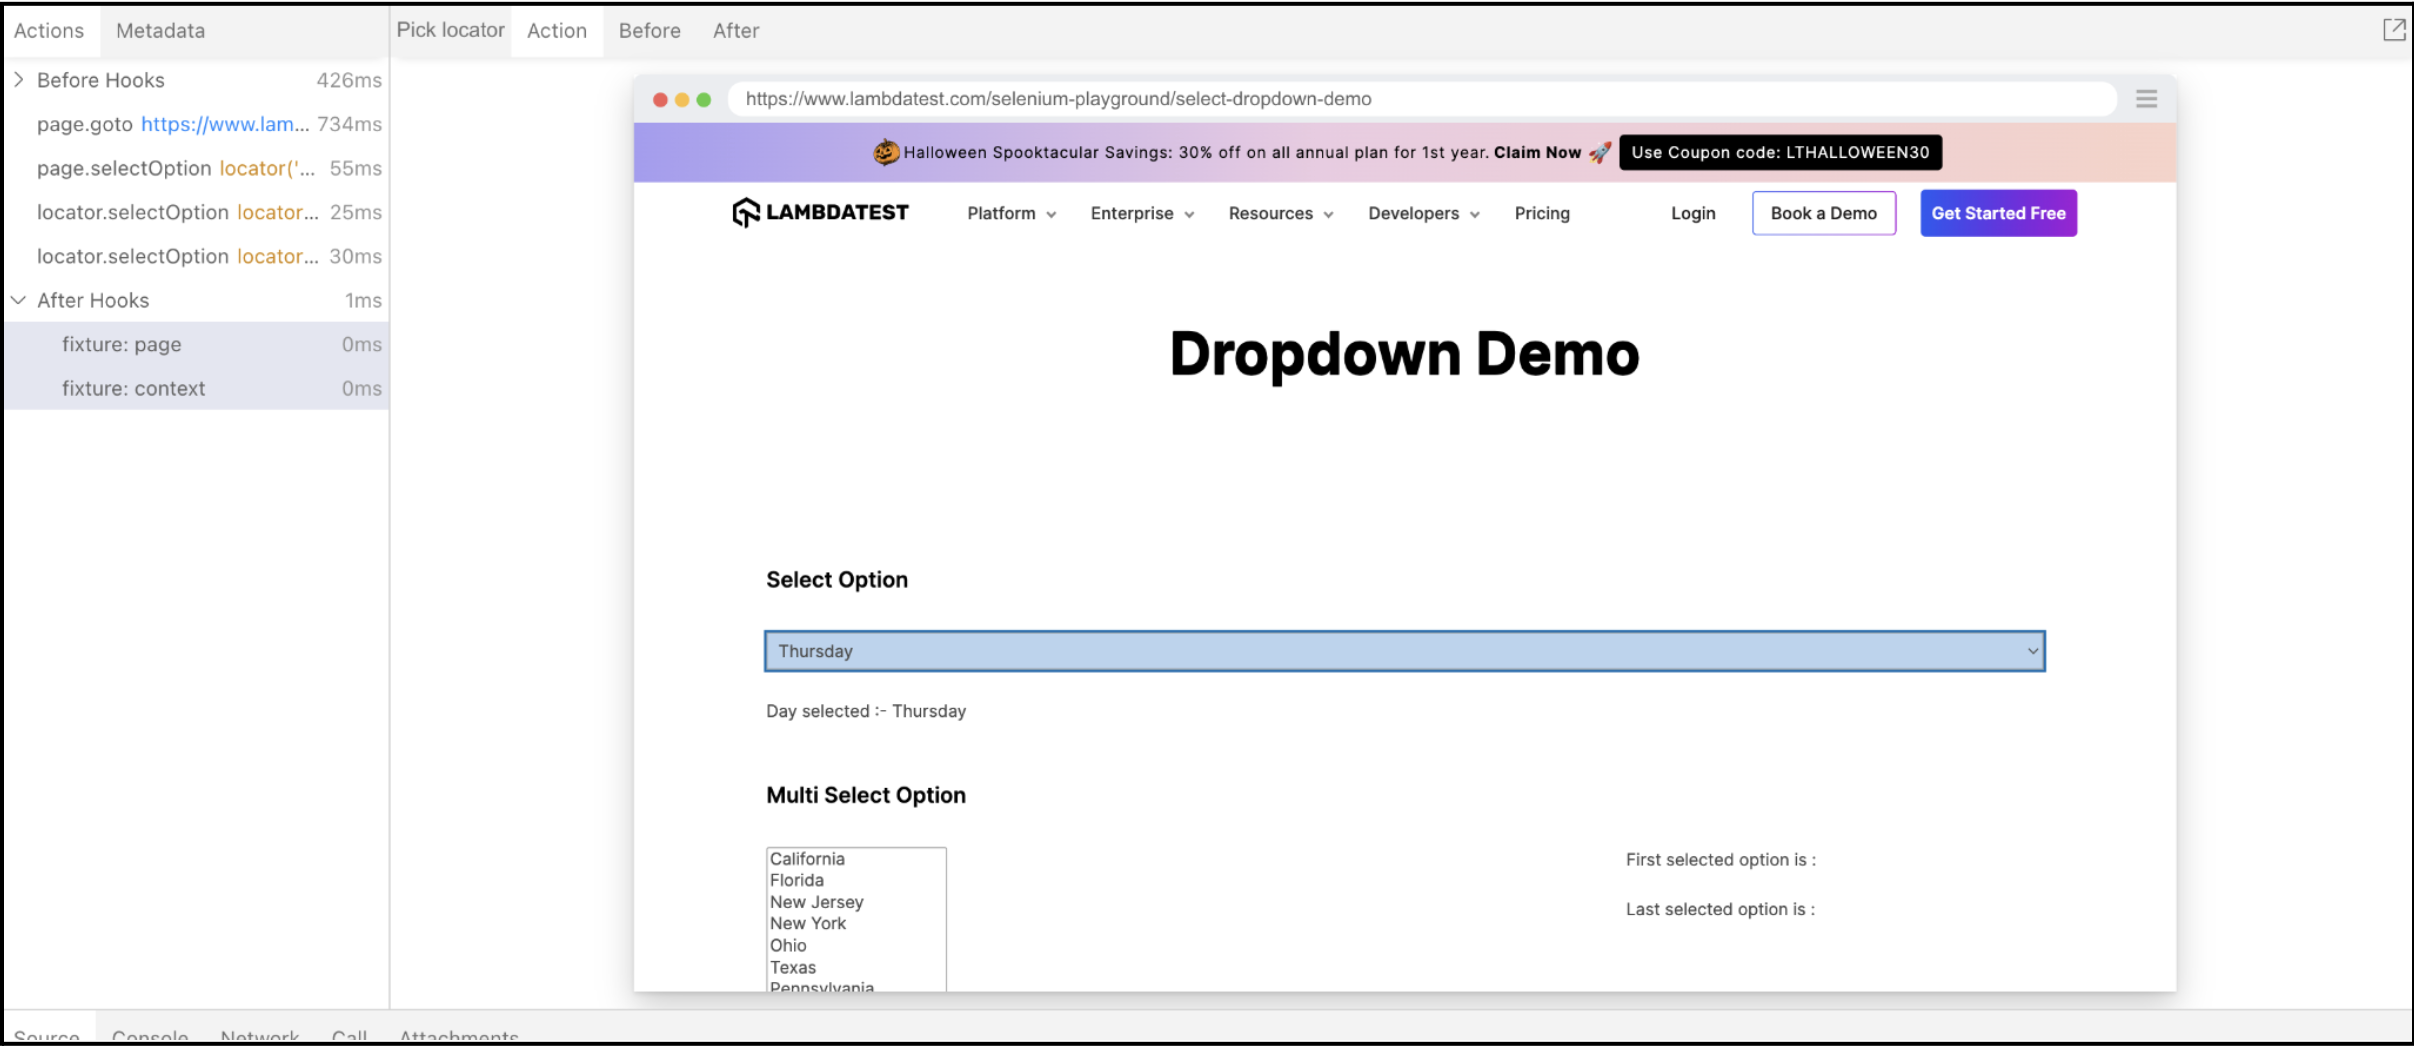
For demo purpose of Drop down lets takes the example of site http://autopract.com/selenium/form5/
Scenario
|
Code of above scenario
test(“Dropdown Testing “, async ({ page }) => {
await page.goto(
“https://www.lambdatest.com/selenium-playground/select-dropdown-demo”
);
//Select option from drop down by value
await page.selectOption(“#select-demo”, “Tuesday”);
//Select option from drop down using index
await page.locator(“#select-demo”).selectOption({ index: 4 });
//Select option from drop down using Label
await page.locator(“#select-demo”).selectOption({ label: “Thursday” });
});
Execute the above code and you can see test case is executed successfully and values from the drop down are selected.
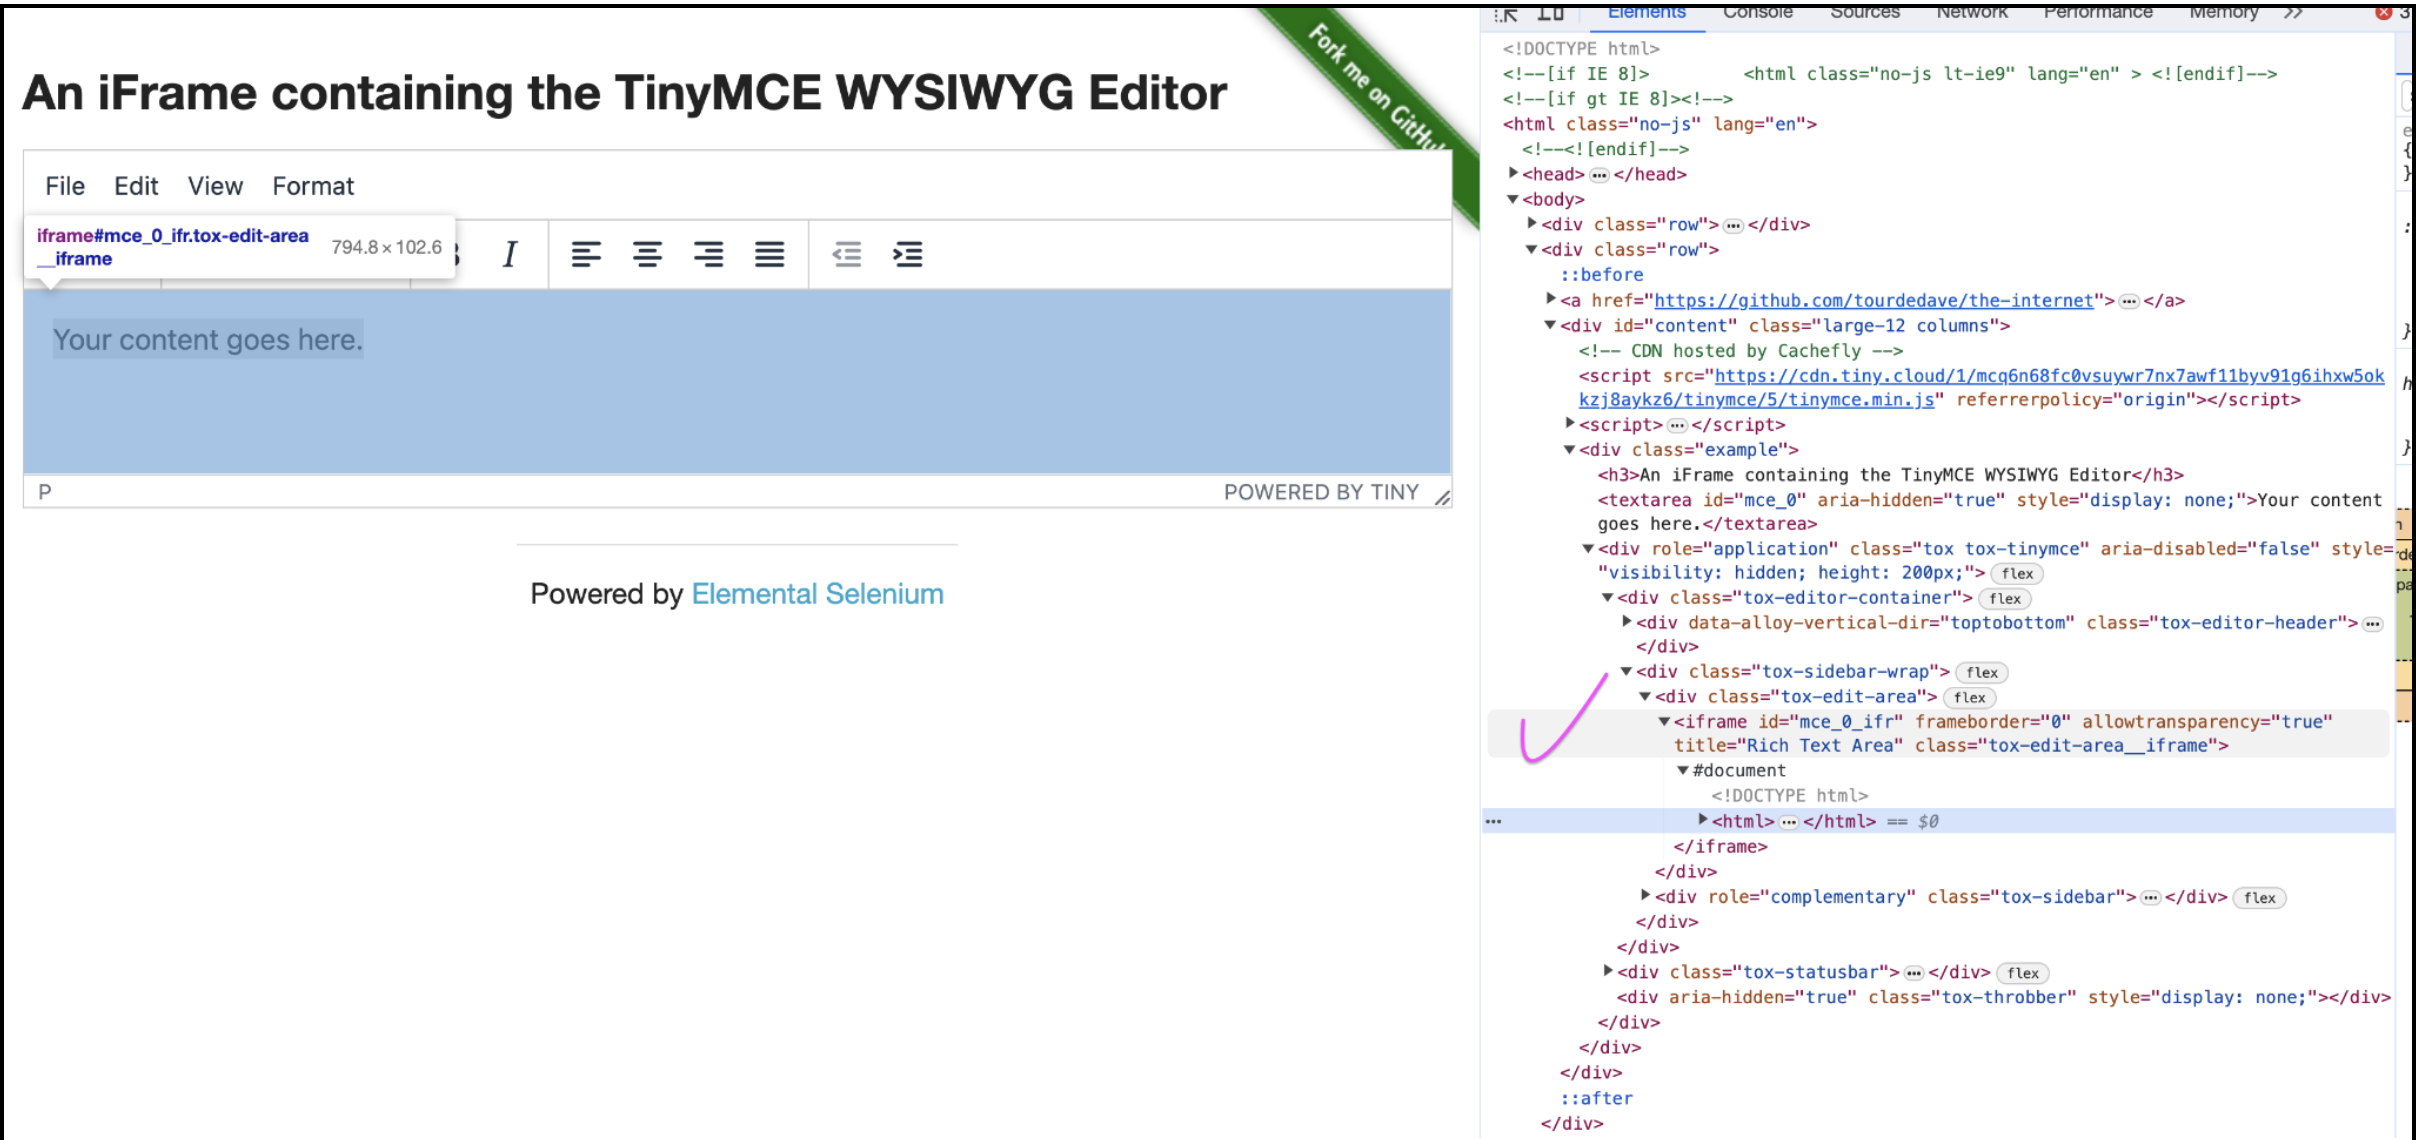
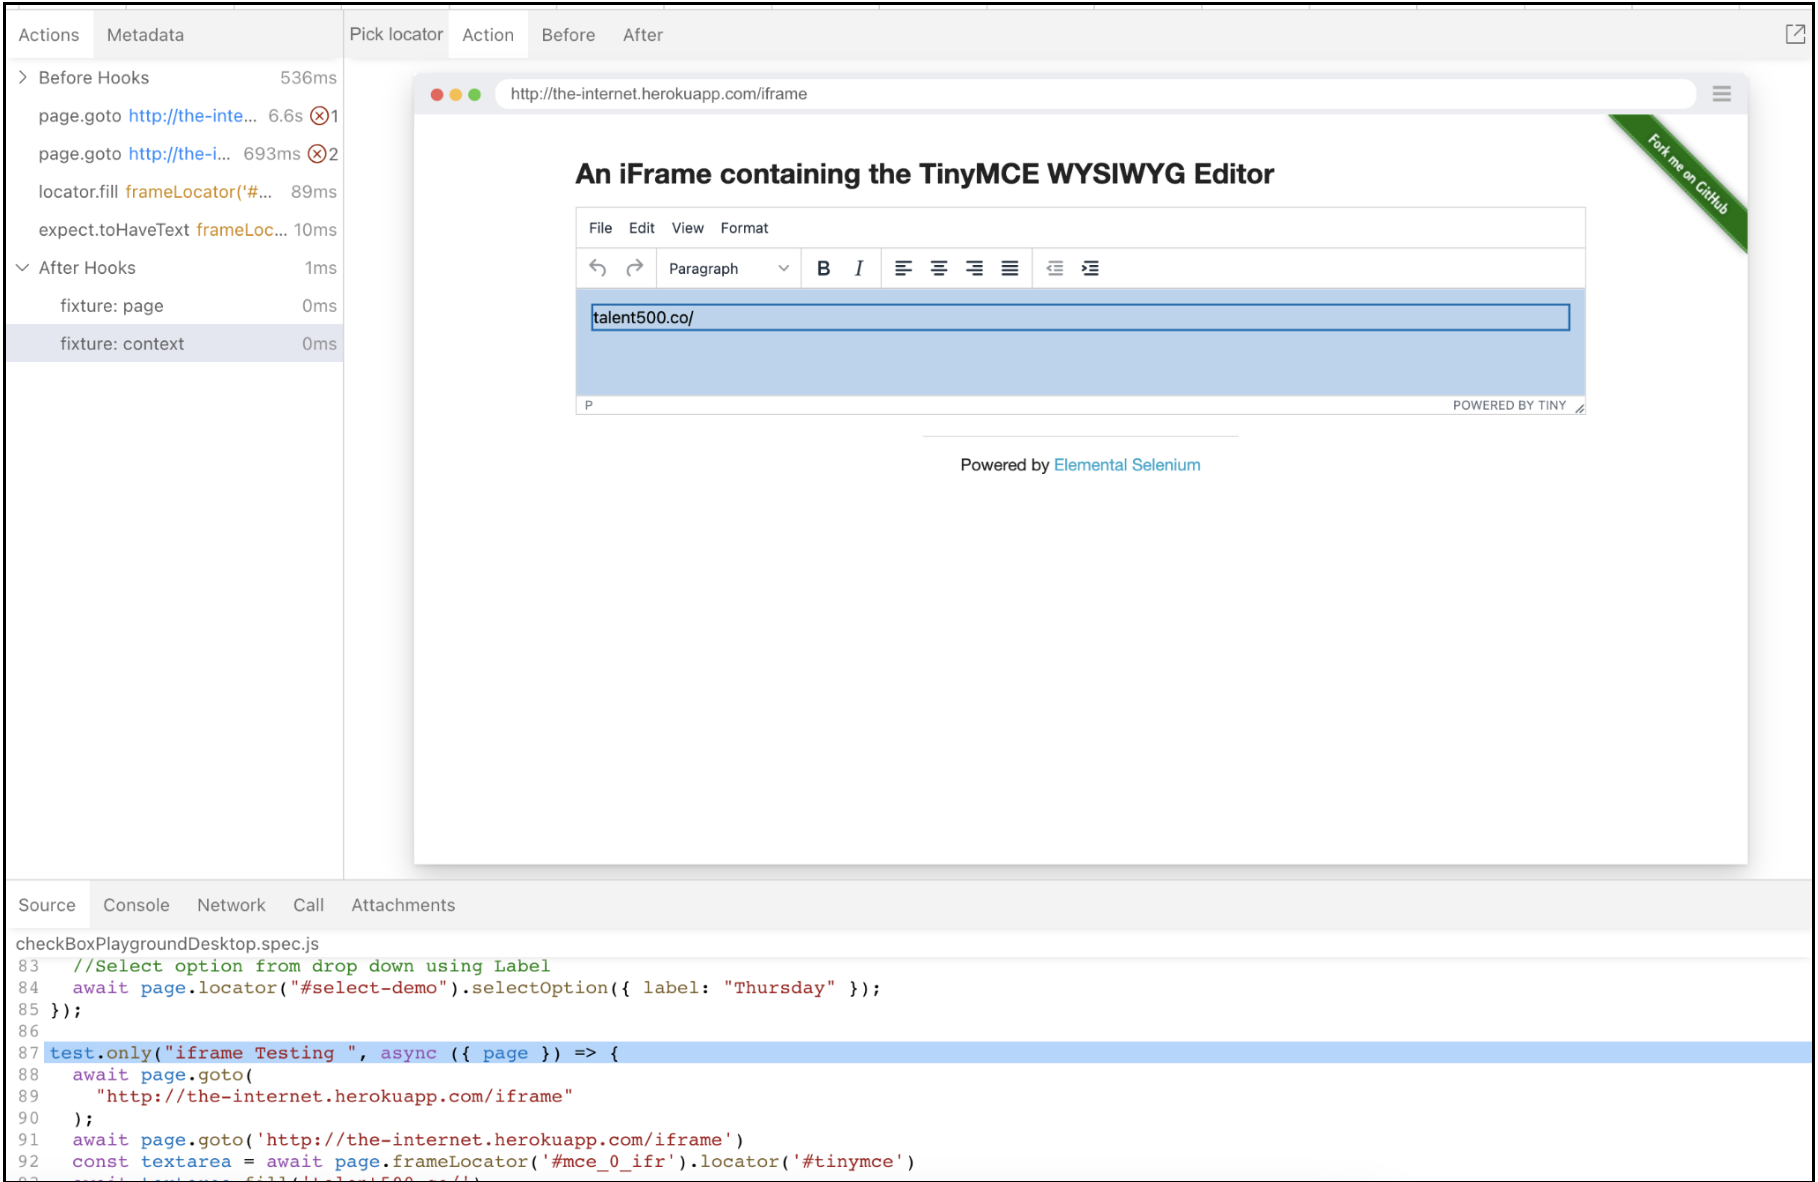
Automate iframe
An HTML element that loads another HTML page inside the document is called an inline frame, or iframe. In essence, it inserts a different webpage inside the main page. They are frequently utilised for interactive content, web analytics, embedded movies, and adverts.
In Playwright .frameLocator() method or function provided by the Playwright library for locating frames on a web page.
// Locate element inside frame
const username = await page.frameLocator(‘.frame-class’).getByLabel(‘User Name’);
await username.fill(‘John’);
In Playwright we can handle iframes very easily. Lets takes an example
Of the site http://the-internet.herokuapp.com/iframe to explain how we can handle iframe
Scenario
|
Code of above scenario
test(“iframe Testing “, async ({ page }) => {
await page.goto(
“http://the-internet.herokuapp.com/iframe”
);
await page.goto(‘http://the-internet.herokuapp.com/iframe’)
const textarea = await page.frameLocator(‘#mce_0_ifr’).locator(‘#tinymce’)
await textarea.fill(‘talent500.co/’)
await expect(textarea).toHaveText(‘talent500.co/’)
});
Execute the above code and you can see test case is executed successfully and you can see text is printed in the text box which is under the iframe.
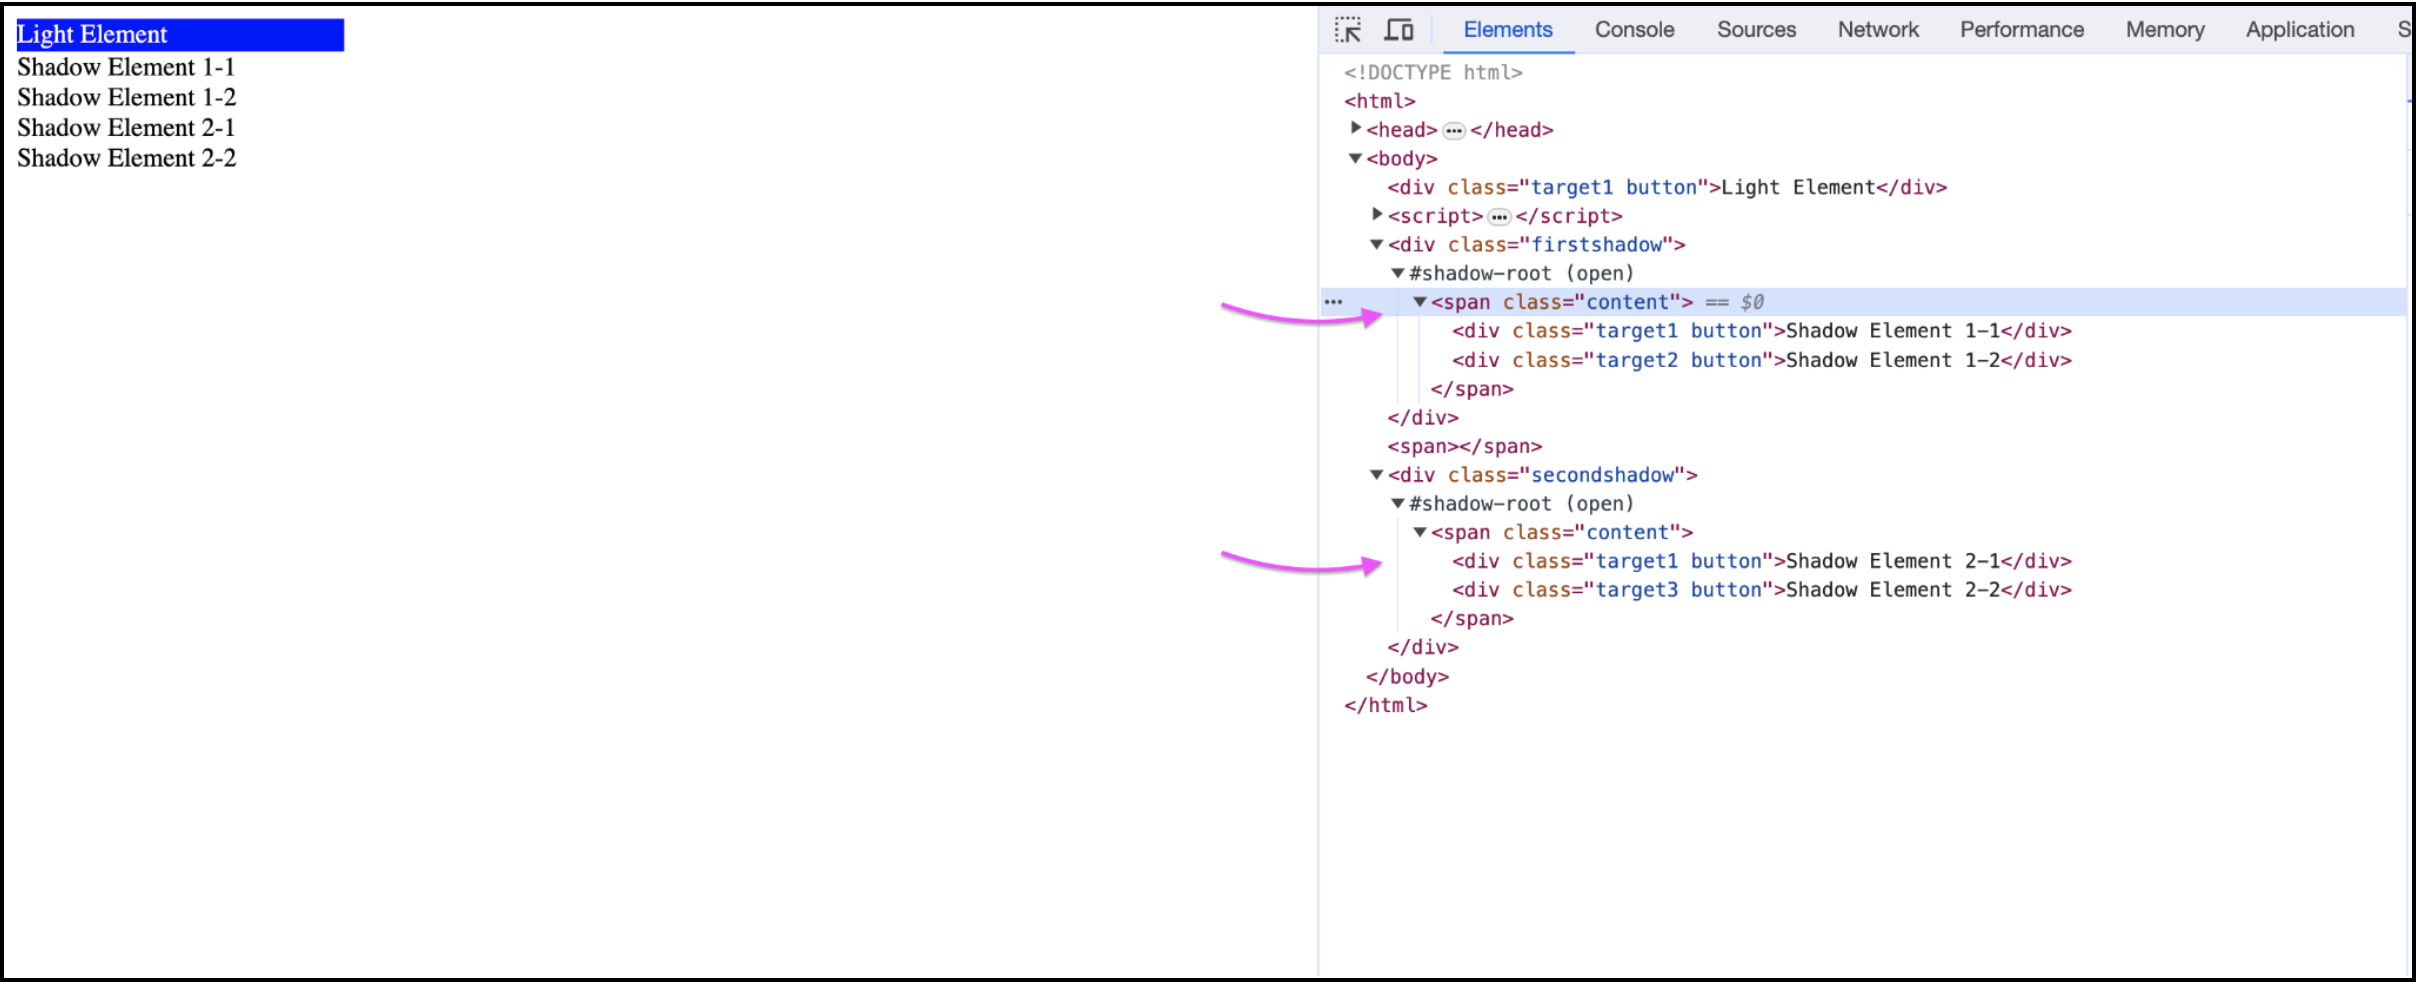
Automate shadow DOM element
The Shadow Document Object Model, or Shadow DOM, is a standard that encodes a DOM subtree inside a shadow tree. JavaScript, CSS, and other web platform operations are protected by this encapsulation so that self-contained DOM subtrees and styles may be created. Specific styles and behaviours may be built for these components by keeping them apart from the rest of the page.
The growing use of enclosed UI elements and web components means that modern online development often necessitates automated interactions with Shadow DOM elements. JavaScript and playwright work together to create a strong automated solution for this kind of task.
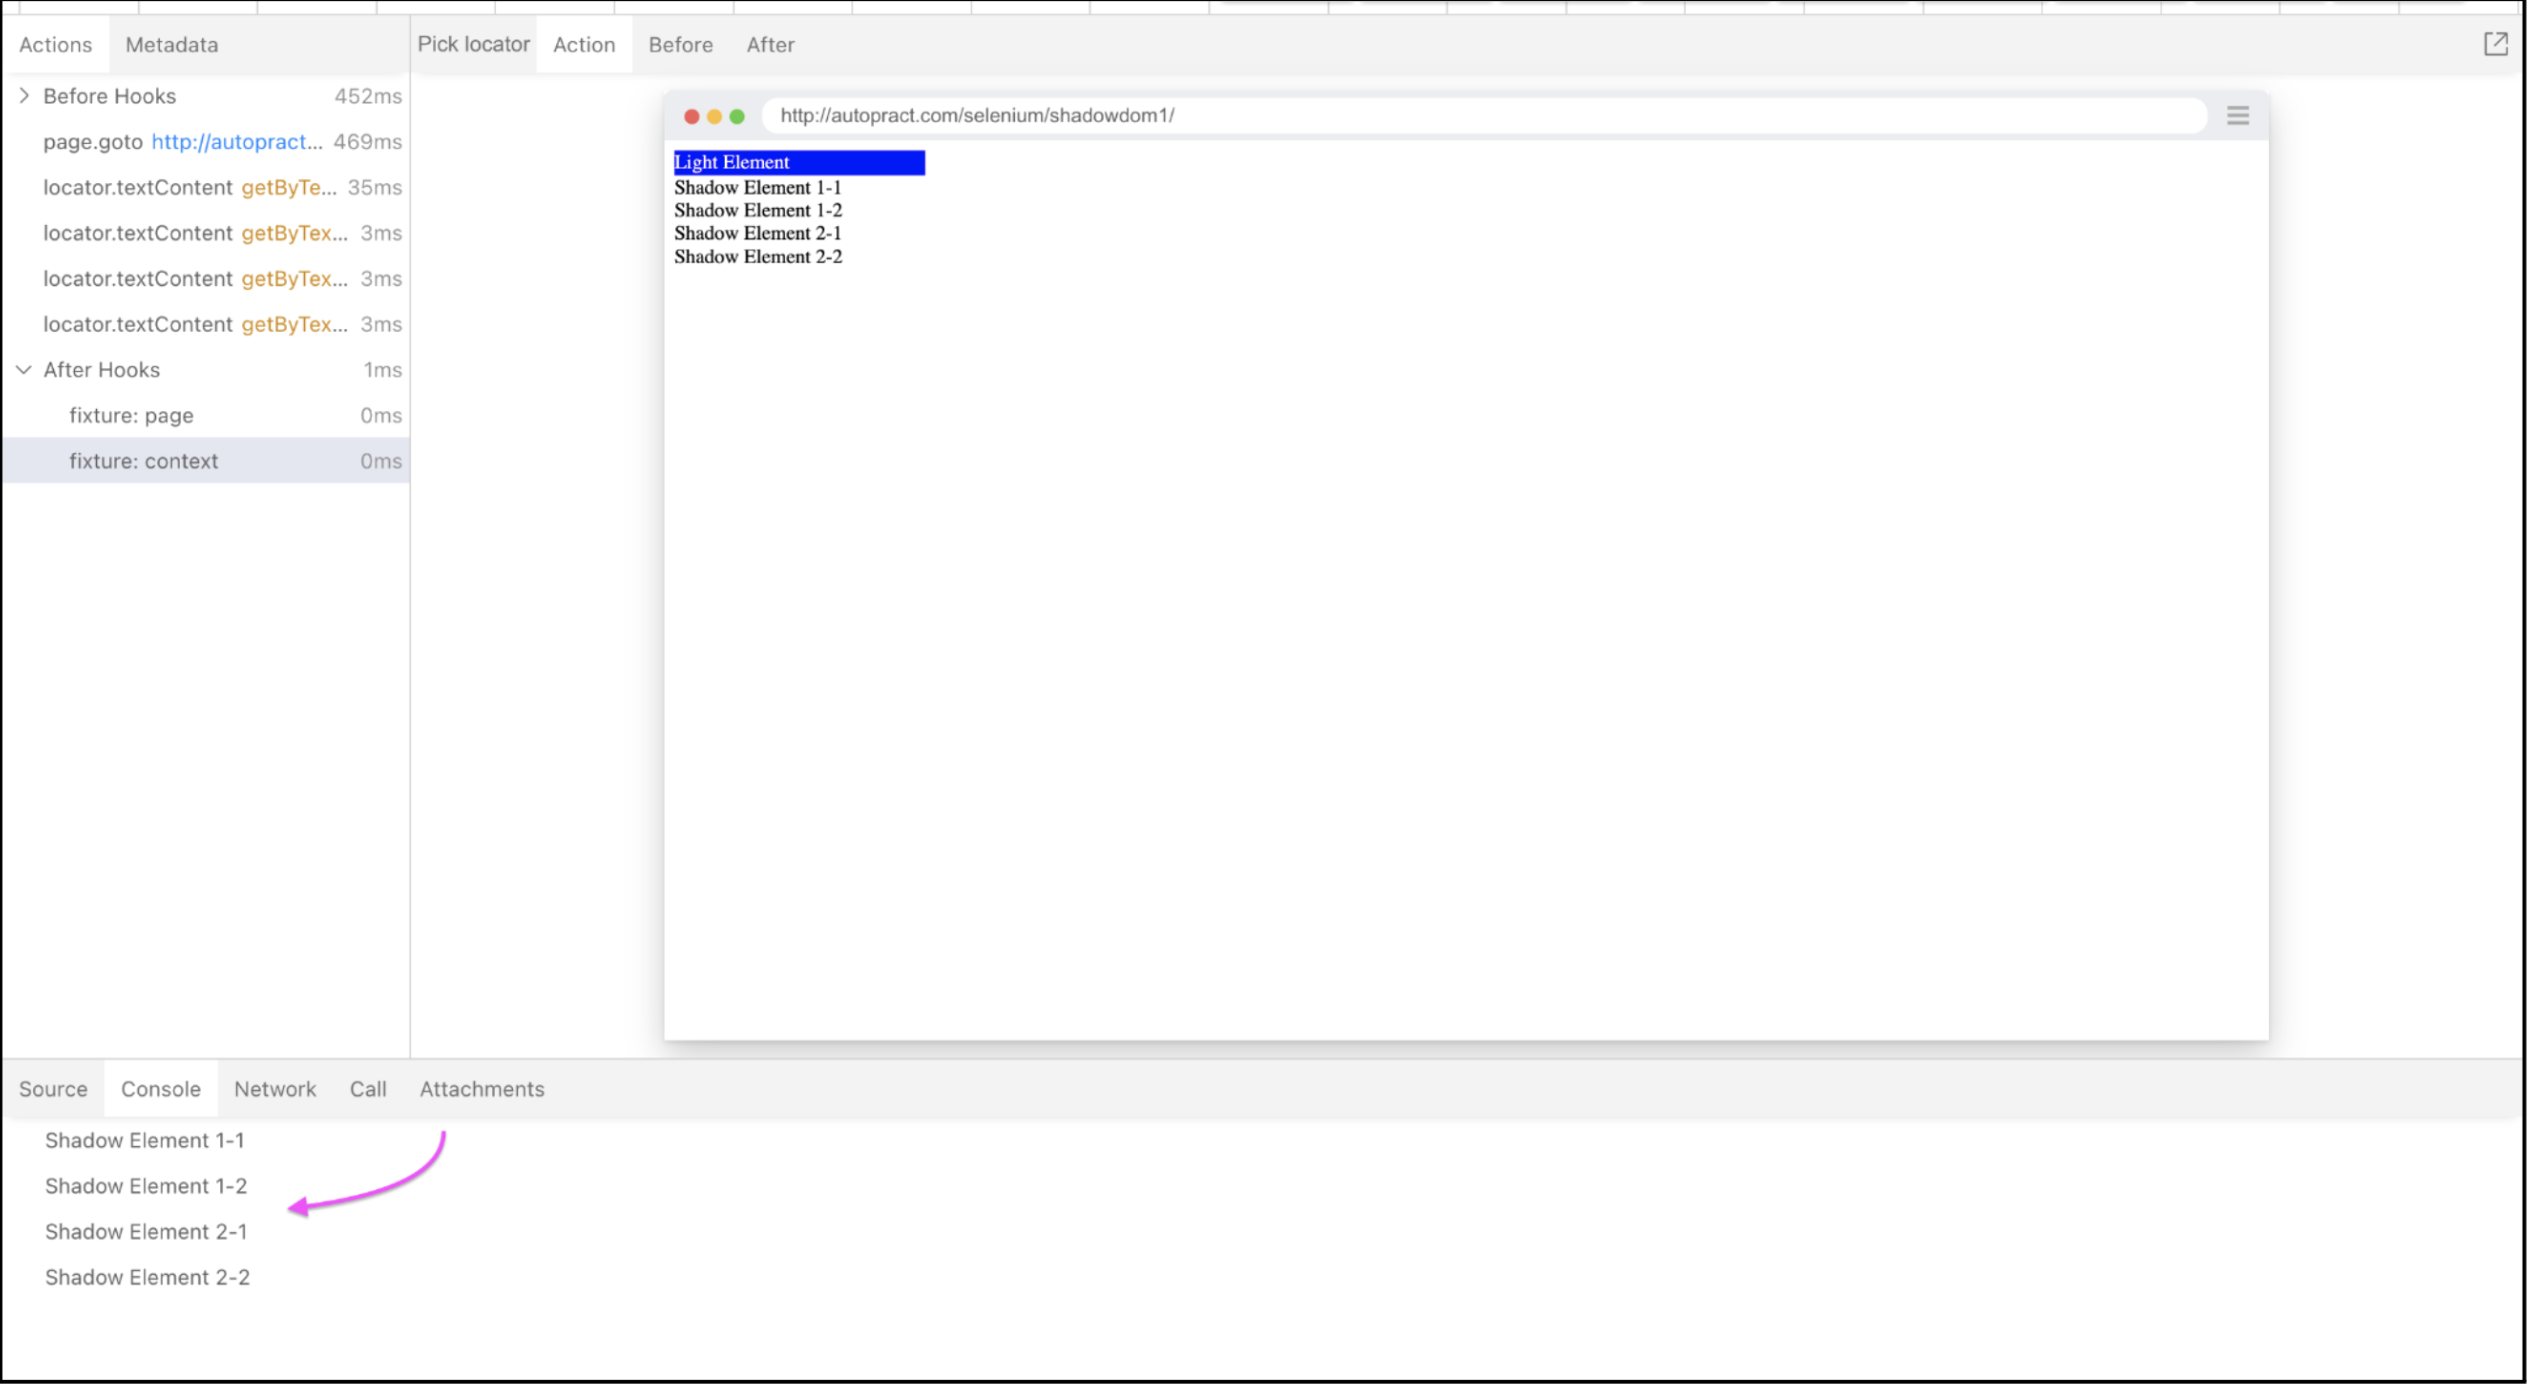
In Playwright we can handle shadow DOM very easily. Lets takes an example
On the site http://autopract.com/selenium/shadowdom1/ to explain how we can handle shadow DOM. In the below screenshot you can see we have FOUR elements which are inside the shadow DOM
Scenario
|
Code of above scenario
test(“Shadow DOM Testing “, async ({ page }) => {
await page.goto(“http://autopract.com/selenium/shadowdom1/”);
// Get the text of Element in Shadow DOM 1
console.log(await page.getByText(‘Shadow Element 1-1’).textContent())
// Get the text of Element in Shadow DOM 2
console.log(await page.getByText(‘Shadow Element 1-2’).textContent())
// Get the text of Element in Shadow DOM 3
console.log(await page.getByText(‘Shadow Element 2-1’).textContent())
// Get the text of Element in Shadow DOM 4
console.log(await page.getByText(‘Shadow Element 2-2’).textContent())
});
Execute the above code and test case is executed successfully and in the console you can see text of elements present under the shadow DOM is printed.
Wrapping up
To sum up, Playwright, an advanced browser automation tool, empowers developers to seamlessly automate UI components such as radio buttons, checkboxes, dropdowns, iframes, and elements within the shadow DOM. Leveraging Playwright’s robust capabilities, developers can interact with these UI elements effortlessly, ensuring a smooth testing and automation experience.