
Overview
NightwatchJS became famous due to its unique characteristics such as concise syntax, multi-browser compatibility, cloud testing readiness, and so on. Under the hood, NightwatchJS makes use of the Webdriver. Webdriver is a Selenium project that adheres to the W3C specification.
NightwatchJS becomes quicker and more consistent thanks to the Webdriver API. NightwatchJS is compatible with Selenium Grid. Because NightwatchJS makes use of the Selenium-based Webdriver API, you may use it to do any activity that Selenium does. In layman’s terms, NightwatchJS may be used to automate Selenium testing.
Since NightwatchJS is built with NodeJS libraries, tests may be written in Javascript or Typescript. NightwatchJS is compatible with all major browsers, including Chrome, Safari, Edge, and Firefox. One of NightwatchJS’s distinguishing characteristics is the ability to execute tests using any test runner, such as Mocha, Cucumber, or Nightwatch.
Advantages of NightwatchJS
- Easy to set up
- Inbuilt Test runner
- Cloud testing support is ready
- Clear syntax
- Page object model support
- Selenium Server support
- CI/CD or DevOps support
- Headless automation support
Setup and Run Selenium Tests in NightwatchJS: Step by Step Tutorial
Prerequisite
Need to Install NodeJS
- Navigate to the download page
- Choose your operating system and download NodeJS (LTS recommended)
Install the NodeJS binaries
Install Visual Studio Code (optional but recommended)
Note: Visual Studio Code is open source and offers a rich interface as well as improved support for NodeJS-based frameworks. We’ll be using VSCode as an IDE in this lesson, but you can use any IDE you like.
Step 1: Creating a fresh folder (ex:nightwatchJSdemo)
To install NightwatchJS and its dependencies, create a new, empty directory.
Step 2: Launch Visual Studio Code app
- Select the File and then Click on Open Folder
- Select a newly created directory (Ex: nightwatchJSdemo)
Step 3: From the Terminal menu in Visual Studio code > Click on New Terminal
Enter the below command to initiate the NightwatchJS installation.
npm init nightwatch
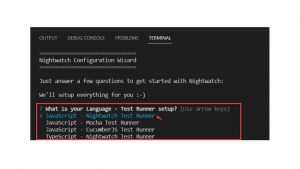
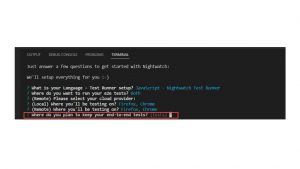
Step 4: Answering the command line questionnaire
NightwatchJS does not install unneeded packages; instead, it installs packages based on the specific choice you select. So, when you input the installation command, the command line tool prompts you with a series of questions, which you must answer.
1st Question: “What is your Language – Test runner setup?”
You can select any choice, however for demonstration reasons, let’s go with Javascript-Nightwatch Test runner.
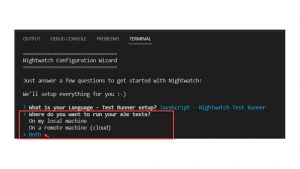
2nd Question “Where do you want to run the e2e tests?”
NightwatchJS tests, as previously stated, may be conducted locally or remotely (cloud).
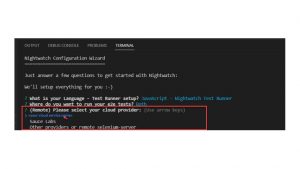
3rd Question “(Remote) select your cloud provider”
Since you selected Both in the previous stage, you must now pick a cloud or remote provider.
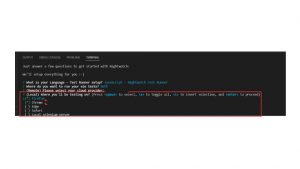
4th Question “ Where you want to run the tests on Local select the browsers”
Let’s install Firefox and Chrome, so select these two.
5th Question “Select the browsers you want to run the tests on remote”
Let’s go with Chrome and Firefox.
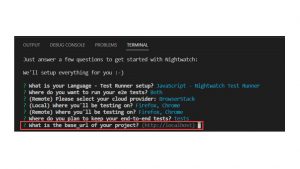
6th Question “Where do you plan to keep your end-to-end tests?”
This is the name of the folder containing the actual test files; the default folder name is “tests”. Let’s select the default folder so you can just press enter.
7th Question “What is the base_url of your project?”
The baseURL can be provided during or after installation. If you don’t supply it during installation, you can set it afterwards in the nightwatch.conf.js file. For the time being, stick with the default of localhost.
NightwatchJS will begin to install once you have answered all of the following questions. The required software as well as its dependencies will be installed.
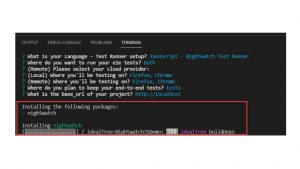
Wait till the installation gets completed.
When the installation is finished, your project folder (for example, nightwatchJSdemo) will look like this:
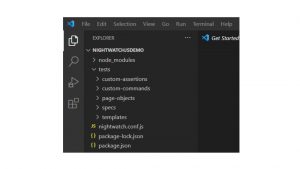
The package.json file keeps track of all installed packages. The package.json file looks like this.
{
“name”: “nightwatchjsdemo”,
“version”: “1.0.0”,
“description”: “”,
“main”: “index.js”,
“scripts”: {
“test”: “echo \”Error: no test specified\” && exit 1″
},
“keywords”: [],
“author”: “”,
“license”: “ISC”,
“devDependencies”: {
“chromedriver”: “^104.0.0”,
“geckodriver”: “^3.0.2”,
“nightwatch”: “^2.3.3”
}
}
Step 5: Create a basic Selenium NightwatchJS script.
There are several sample tests provided by default in the specs directory; however, because we are just getting started with NightwatchJS, let’s start by developing a basic test.
Navigate to the tests folder in the Project root folder (for example, NightwatchJSdemo) and create a file called demo-test.js.
Write the NightwatchJS script as shown below:
describe(‘Talent500 Demo’, function() {
before(browser => browser.navigateTo(‘https://Talent500.com’));
it(‘Verify home page’, async function(browser) {
await browser
.waitForElementVisible(‘a.logo’)
.assert.titleContains(‘Most Reliable App & Cross Browser Testing Platform | Talent500’)
});
it(‘Verify product page’, async function(browser) {
await browser
.click(‘a[title=”Pricing”]’)
.waitForElementVisible(‘#pricing’)
.waitForElementVisible(‘a[data-toggle-id=”automate”]’)
.assert.textContains(‘a[data-toggle-id=”automate”]’, ‘Automate’)
.assert.textContains(‘a[data-toggle-id=”live”]’, ‘Live’)
.assert.textContains(‘a[data-toggle-id=”percy”]’, ‘Percy’)
.assert.textContains(‘a[data-toggle-id=”app-live”]’, ‘App Live’)
.assert.textContains(‘a[data-toggle-id=”app-automate”]’, ‘App Automate’)
});
after(browser => browser.end());
});
Let’s break out the aforementioned code snippets:
In the next it() block,
- .click(‘a[title=”Pricing”]’) – We are clicking on the Pricing menu
Following instructions are added to validate the list of product names that we are clicking on.
Step 6: Execute the Nightwatch tests
NightwatchJS allows you to run all of the tests or just a subset of them.
Using the below command execute the Single tests
Syntax:
npx nightwatch <path_to_test.js>
Using the below command execute all the tests
Syntax:
npx nightwatch
To keep things simple, let’s run only one test using the command.
npx nightwatch tests/demo-test.js
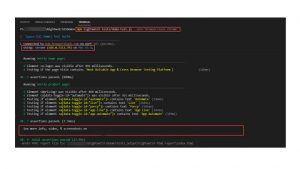
Step 7: View the result
Wait until the execution is finished; the command line output displays the execution result, including the test case name and assertions.
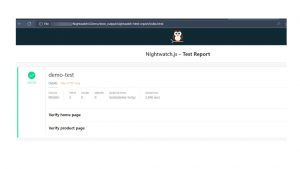
Nightwatch HTML Reporter
The default setup includes an HTML reporter, which is put under \tests_output\nightwatch-html-report\index.html path
The HTML report will look as shown below:
Run NightwatchJS tests on Firefox
Since you selected Firefox and Chrome as browsers during installation, the configurations in nightwatch.conf.js will be produced automatically during the installation.
Use the below command in order to run the NightwatchJS in firefox:
npx nightwatch <path_to_test.js> –env firefox
By running the command, make sure the geckodriver is installed.
npx geckodriver –version
The command should output the installed version
Run NightwatchJS tests on Chrome
NightwatchJS also supports the Chrome browser, and you can run NightwatchJS tests on Chrome by using the -env option in the command line.
npx nightwatch <path_to_test.js> –env chrome
By running the command make sure the chromedriver is installed.
npx chromedriver –version
The command should output the installed version
NightwatchJS allows for multiple browsers and parallel processing. The NightwatchJS tests may be run in many browsers at the same time.
To execute NightwatchJS tests parallely on multiple browsers use the below command:
npx nightwatch <path_to_test.js> –env chrome,firefox
Running the NightwatchJS on Remote Machine (Cloud)
NightwatchJS works with Remote Selenium Grid to run tests. These tests may be run on any cloud platform that supports NightwatchJS. Many frameworks offer such cloud execution, however the advantage of NightwatchJS is that you don’t have to bother about settings.
Since you selected your computer as the remote machine during the installation questionnaire (Stage 4), NightwatchJS includes your system settings as part of the installation step. The configuration may be found in the file nightwatch.conf.js.
Run NightwatchJS Test on Real Devices
You must enter the Username and Access key to launch NightwatchJS. This is specific to each user and is supplied.
Copy the Username and Access Key
- Login
- Navigate to Profile > Summary
- Copy the Username and Access Key

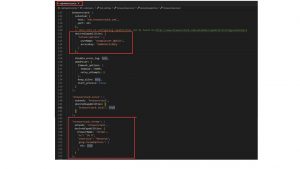
Modifying the NightwatchJS configuration file
- Navigate to nightwatch.conf.js file situated in your root directory
- Search for desiredCapabilities under the browsertack option
- Look for userName and accessKey options
- Add the values
Configure run time environments
The environment refers to the browsers and operating systems that will be used on your system. The default settings are provided based on the installation questionnaire, but you may tweak it further.
Execute NightwatchJS tests
You can execute the tests once you configure the test environment with NightwatchJS
Command to execute the tests
Syntax:
npx nightwatch <path_to_test.js> –env='<Talent500_env>’
Example
npx nightwatch tests/demo-test.js –env=’Talent500.chrome’
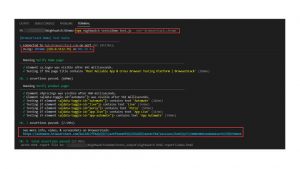
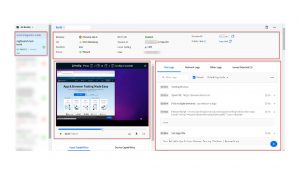
View Results
Wait until the command line output displays a summary of the test run. Once the test run is complete the command line output gives the summary of execution along with the Talent500 URL, by accessing the URL you can simply check the comprehensive reports of test execution.
Command Line Output
Results page
NightwatchJS Tips and Tricks
-
Run NightwatchJS tests on headless mode
NightwatchJS supports headless mode; you may enable it by supplying the -headless option.
npx nightwatch –env chrome –headless
-
Execute a single test and all at once in NightwatchJS
NightwatchJS tests can be run individually or all at once.
Using the below command,execute the Single tests using the below command
Syntax:
npx nightwatch <path_to_test.js>
Using the below command, execute all the tests
Syntax:
npx nightwatch
-
In NightwatchJS, execute a group of tests or folders in
You may run all of the tests in the folder at once by using the -group option.
npx nightwatch –group tests/with-page-objects
-
After completion of NightwatchJS test execution open HTML report
When the test is complete, the -open option displays the HTML report in your default browser.
npx nightwatch tests/demo-test.js –env firefox –headless –open
-
On cloud platforms, run NightwatchJS tests on multiple environment parallelly
If you have numerous environments established for cloud platforms, you may specify them using the command line option -env. The cloud platform will be used to execute all of the tests.
npx nightwatch tests/demo-test.js –env ‘Talent500.chrome,Talent500.firefox’
Conclusion
NightwatchJS is an easy-to-use automation framework that works across different browsers and platforms. The outcome of the tests is determined not only by the test case but also by the environment in which they are executed. If your execution environment is unstable, false failures are more frequent. The many false failures render the automated tests ineffective.
Since cloud-based testing platforms are robust, they give consistent and accurate findings by taking into consideration real-world user situations.