
Today’s world is completely data-driven. Each encounter is a data point. The emails you send are managed by Google’s servers as data. Every interaction is a piece of data. However, as you may have noted, they are linked to the internet and not physically joined. All of a company’s needs in terms of software as a service, platform as a service, and infrastructure as a service may be met by Cloud Computing. Nowadays, no one enjoys making software for each of their use cases, building platforms, or managing their own data center.
Steve Jobs said, and I quote, “I don’t need a hard disk in my computer, if I can get a server faster.” Carrying around those non-connected computers is byzantine by comparison. In this age of the cloud, Steve’s brilliance is obvious.
There are many software as a service (SaaS) providers nowadays, and many of them use cloud providers like Amazon Web Services, Microsoft Azure, Google Cloud Platform and others. However, the costs associated with maintaining such softwares will continue to rise indefinitely as their usage increases. The many services are each assumed to have their own infrastructure, including networks, virtual machines, databases, load balancers, and more. Not going to explain every nuance, but hopefully you get the gist. A large group of people would be needed to handle this.
Following terraform, an entrant emerged. Terraform is an open-source infrastructure-as-code software solution that enables you to build, modify, and enhance your infrastructure in a reliable and consistent manner. Cloud LaaS resource provisioning, management, and modification became as easy as writing a single line of code.
What is Infrastructure as Code with Terraform?
Infrastructure as Code (IaC) tools let you control infrastructure with configuration files, optimal JSON (GUI). IaC allows you to develop, alter, and manage your infrastructure in a safe, consistent, and repeatable way.
HashiCorp makes Terraform, an infrastructure-as-code technology. It maintains your infrastructure’s lifespan and allows you to define resources and infrastructure in human-readable configuration files. Terraform is better than hand-managing infrastructure in various aspects.
- Terraform supports multiple cloud platforms
- Easy-to-read configuration language speeds up infrastructure coding
- Terraform’s state lets you track resource changes during deployment
- Allows safe collaboration on infrastructure by versioning configurations
- It’s open-source
Terraform Basics
Getting Started with Terraform
What would you need?
->Terraform CLI
-> AWS CLI
-> An Editor, preferably VS Code
-> Terraform VS Code Editor IDE
Installation on MacOS
Terraform Installation
Download Terraform MAC
Install CLI
Unzip the package
# Copy binary zip file to a folder
mkdir /Users/<YOUR-USER>/Documents/terraform-install
COPY Package to “terraform-install” folder
# Unzip
unzip <PACKAGE-NAME>
unzip terraform_0.14.3_darwin_amd64.zip
# Copy terraform binary to /usr/local/bin
echo $PATH
mv terraform /usr/local/bin
# Verify Version
terraform version
VS Code and Terraform Plugin Installation
Microsoft Visual Studio Code Editor
Hashicorp Terraform Plugin for VS Code
AWS CLI Installation
# Install AWS CLI V2
curl “https://awscli.amazonaws.com/AWSCLIV2.pkg” -o “AWSCLIV2.pkg”
sudo installer -pkg AWSCLIV2.pkg -target /
which aws
aws –version
Configure AWS Credentials
aws configure
AWS Access Key ID [None]: AKIASUF7DEFKSIAWMZ7K
AWS Secret Access Key [None]: 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
Default region name [None]: us-east-1
Default output format [None]: json
# Verify if we are able list S3 buckets
aws sts get-caller-identity
Installation on Linux
Terraform Installation
Download Terraform MAC
Install CLI
VS Code and Terraform Plugin Installation
Microsoft Visual Studio Code Editor
Hashicorp Terraform Plugin for VS Code
AWS CLI Installation and AWS Credentials
Follow similar steps from macOS to configure AWS-CLI
Installation on Windows
Terraform Installation
Download Terraform
Install CLI
Unzip the package
Create new folder terraform-bins
Copy the terraform.exe to a terraform-bins
Set PATH in windows
VS Code and Terraform Plugin Installation
Microsoft Visual Studio Code Editor
Hashicorp Terraform Plugin for VS Code
AWS CLI Installation and AWS Credentials
Follow similar steps to configure AWS-CLI
Terraform Workflow and Commands
Terraform blocks can be very confusing. To make it simple to understand, we will cover terraform workflow and move right into some command basics.

Command: terraform init
With this, the config directory, which stores all of the setup files, may be initialized. Basically, this is executed anytime a piece of code is added or removed from the configurations. The providers are downloaded at your command (basically AWS plugin in our case).
Command: terraform validate
Performs a syntax check and an integrity check on the configuration files to ensure they are valid. The term “internally consistent” refers to the fact that all resource changes have been checked. Attempting to delete an empty resource, for instance, should fail validation.
Command: terraform plan
This command creates an execution plan and notifies what all changes are likely to be made.
Command: terraform apply
Apply is used to apply the configuration as the name suggests.
Command: terraform destroy
Used to destroy a configuration, and applies the change post user confirmation.
Demo Project to Create an EC2 machine using Terraform
With an understanding of what these commands perform, now write some code to build a VM in AWS, often known as EC2 or Elastic Cloud Compute. However, you must first meet the following requirements:
- There is an active VPC in the region
- AWs Credentials is working
Let’s create our first terraform-manifests. You can use this sample code below.
# Terraform Settings Block
terraform {
required_providers {
aws = {
source = “hashicorp/aws”
#version = “~> 3.21” # Optional but recommended in production
}
}
}
# Provider Block
provider “aws” {
profile = “default” # AWS Credentials Profile configured on your local desktop terminal $HOME/.aws/credentials
region = “us-east-1”
}
# Resource Block
resource “aws_instance” “ec2demo” {
ami = “ami-04d29b6f966df1537” # Amazon Linux in us-east-1, update as per your region
instance_type = “t2.micro”
}
As you would see, Terraform employs three different blocks: the Settings block, the Provider block, and the Resource block. For the time being, we may ignore this and concentrate on the terraform init/validate/plan/apply/destroy command. In our subsequent blog, we’ll go into greater depth on this topic.
The following is provided solely for your education:
The cloud provider’s Terraform plug-in and the Terraform version are both specified in the settings block. It’s AWS for us. After declaring the resource in the resource block, we specify the cloud provider’s area in which the resource will be created in the provider’s block.
Command Execution
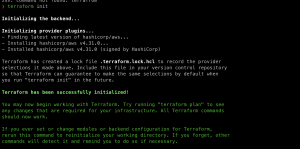
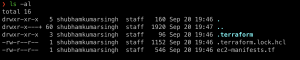
Step 1: Go to the location where you saved the manifest. The current working directory should be the same as the location of your Terraform manifests. Now let’s run terraform init. This would start the terraform and load the AWS HashiCorp plug-in. Along with it, a terraform.lock.hcl file is generated. It saves the version we’re using so that if there are any changes in the future, it can refer to it.
Step 2: At this point, we can run terraform validation. It will notify you if there is a problem with the file. Otherwise, a configuration valid message will be displayed on the screen.

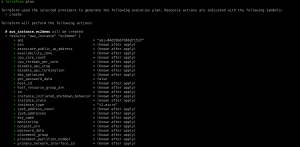
Step 3: Now execute the terraform plan. This will print all of the resources that terraform will be producing as part of this project. The ‘+’ symbol indicates that it will create it, while the ‘-‘ sign indicates that it will modify it.
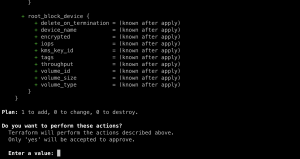
Step 4: Finally, run and apply terraform. This time, construct a plan and ask for yes or no confirmation. Choose yes – this will launch an ec2 instance.
Conclusion
A fundamental understanding of Terraform is now at your disposal. Declarative language makes it simple to define the exact system architecture you need to build. You can test your modifications and find bugs before releasing them with the plan command. You can maintain DRY and effective code with the help of variables, references and dependencies, which will be covered in subsequent blogs.
Remember, we have barely begun to scratch the surface. For how to manage Terraform state demonstrates, how Terraform remembers the infrastructure it has already built, and how it has far-reaching implications for the way you organize your Terraform code – stay tuned for the next Terraform series.